Before the Battle – 1645
April
Fairfax sets off to relieve siege of Taunton Islip Bridge – Cromwell defeats Earl of Northampton.
7 May
Charles I leaves Oxford – joins forces with Prince Rupert, Maurice, Langdale & Sir Jacob Astley Goring sent to relieve Taunton Fairfax abandons march on Taunton with majority of New Model Army
22 May
Fairfax & Cromwell begin siege of Oxford
29 May
Prince Rupert begins siege of Leicester to draw Fairfax away from Oxford
30 May
Royalists storm Leicester
4 June
Charles I & Royalist army march towards Market Harborough. Fairfax raises siege of Oxford & marches north to join Cromwell, now appointed Lieutenant-General of Horse.
13 June
Royalist army at Market Harborough Parliamentarian army at Guilsborough.
Evening of 13 June
Parliamentarian patrol led by Ireton clashes with a small detachment of Charles’s Life Guard at Naseby – the Royalists captured playing quoits in the church. At the later Council of War, Royalists divided – Prince Rupert and Astley advocate continuing north, but outvoted – the decision is to turn and fight.

14th June
Below we have outlined the key movements during those fateful hours.
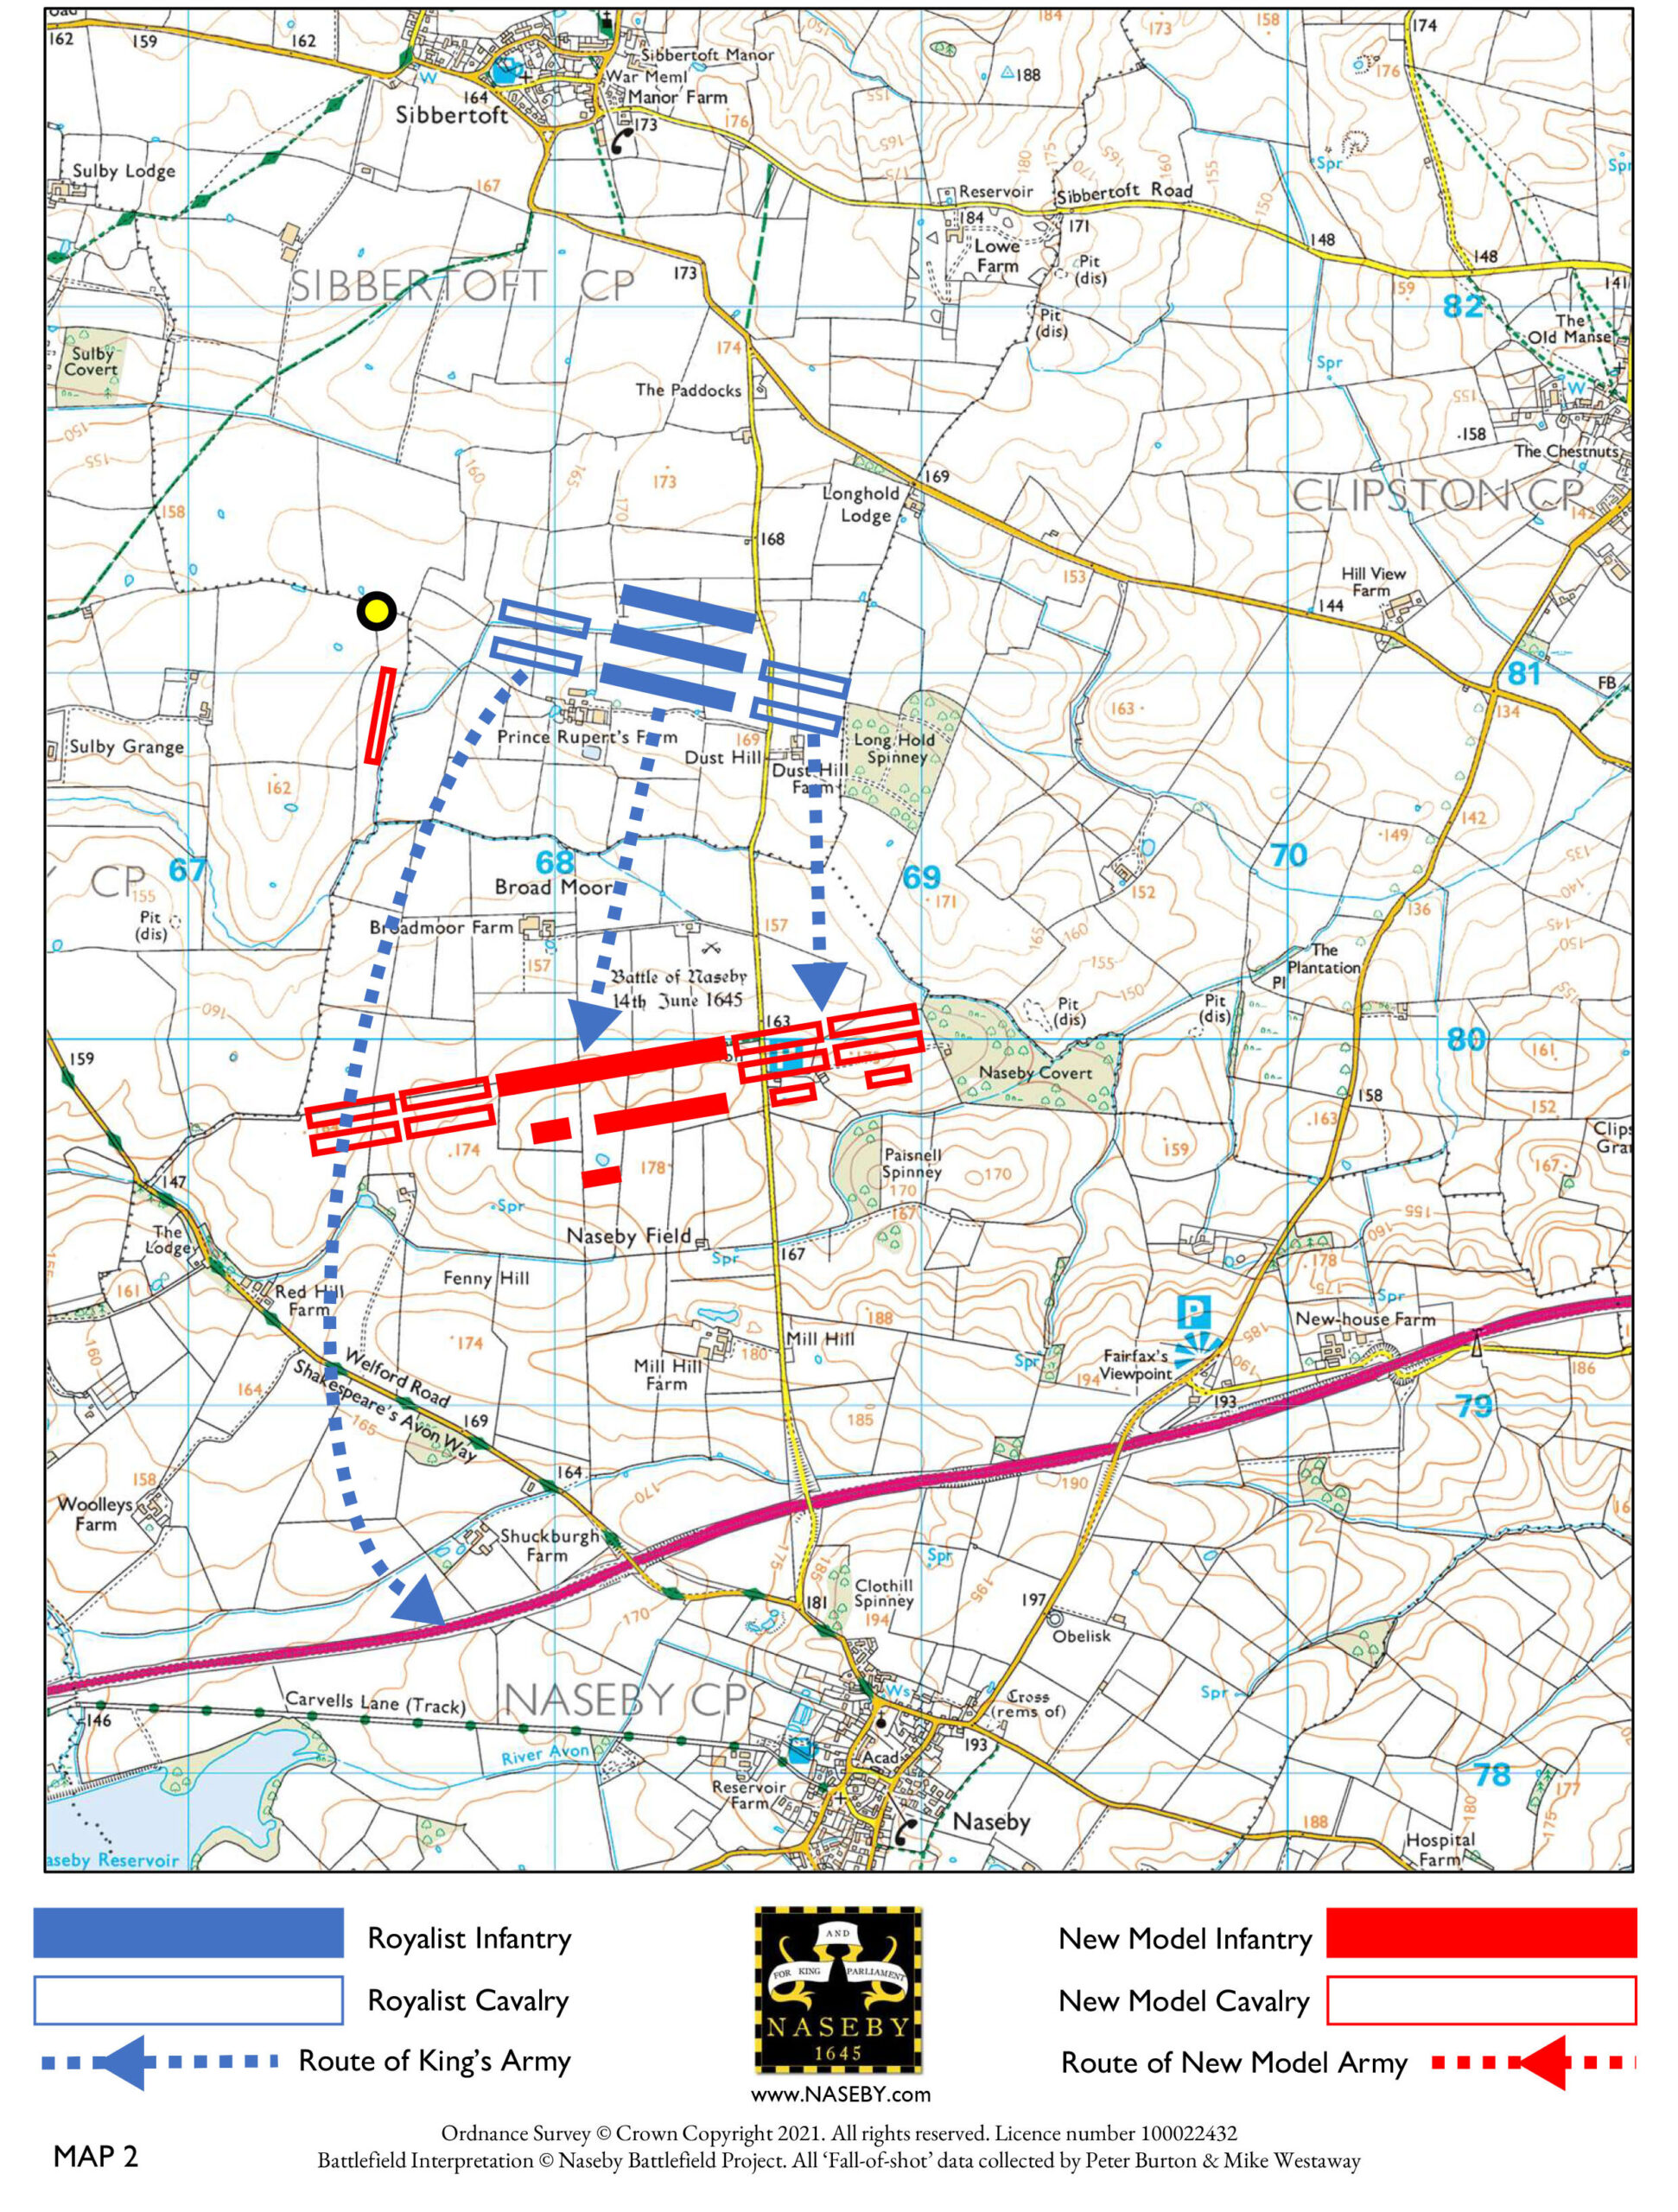
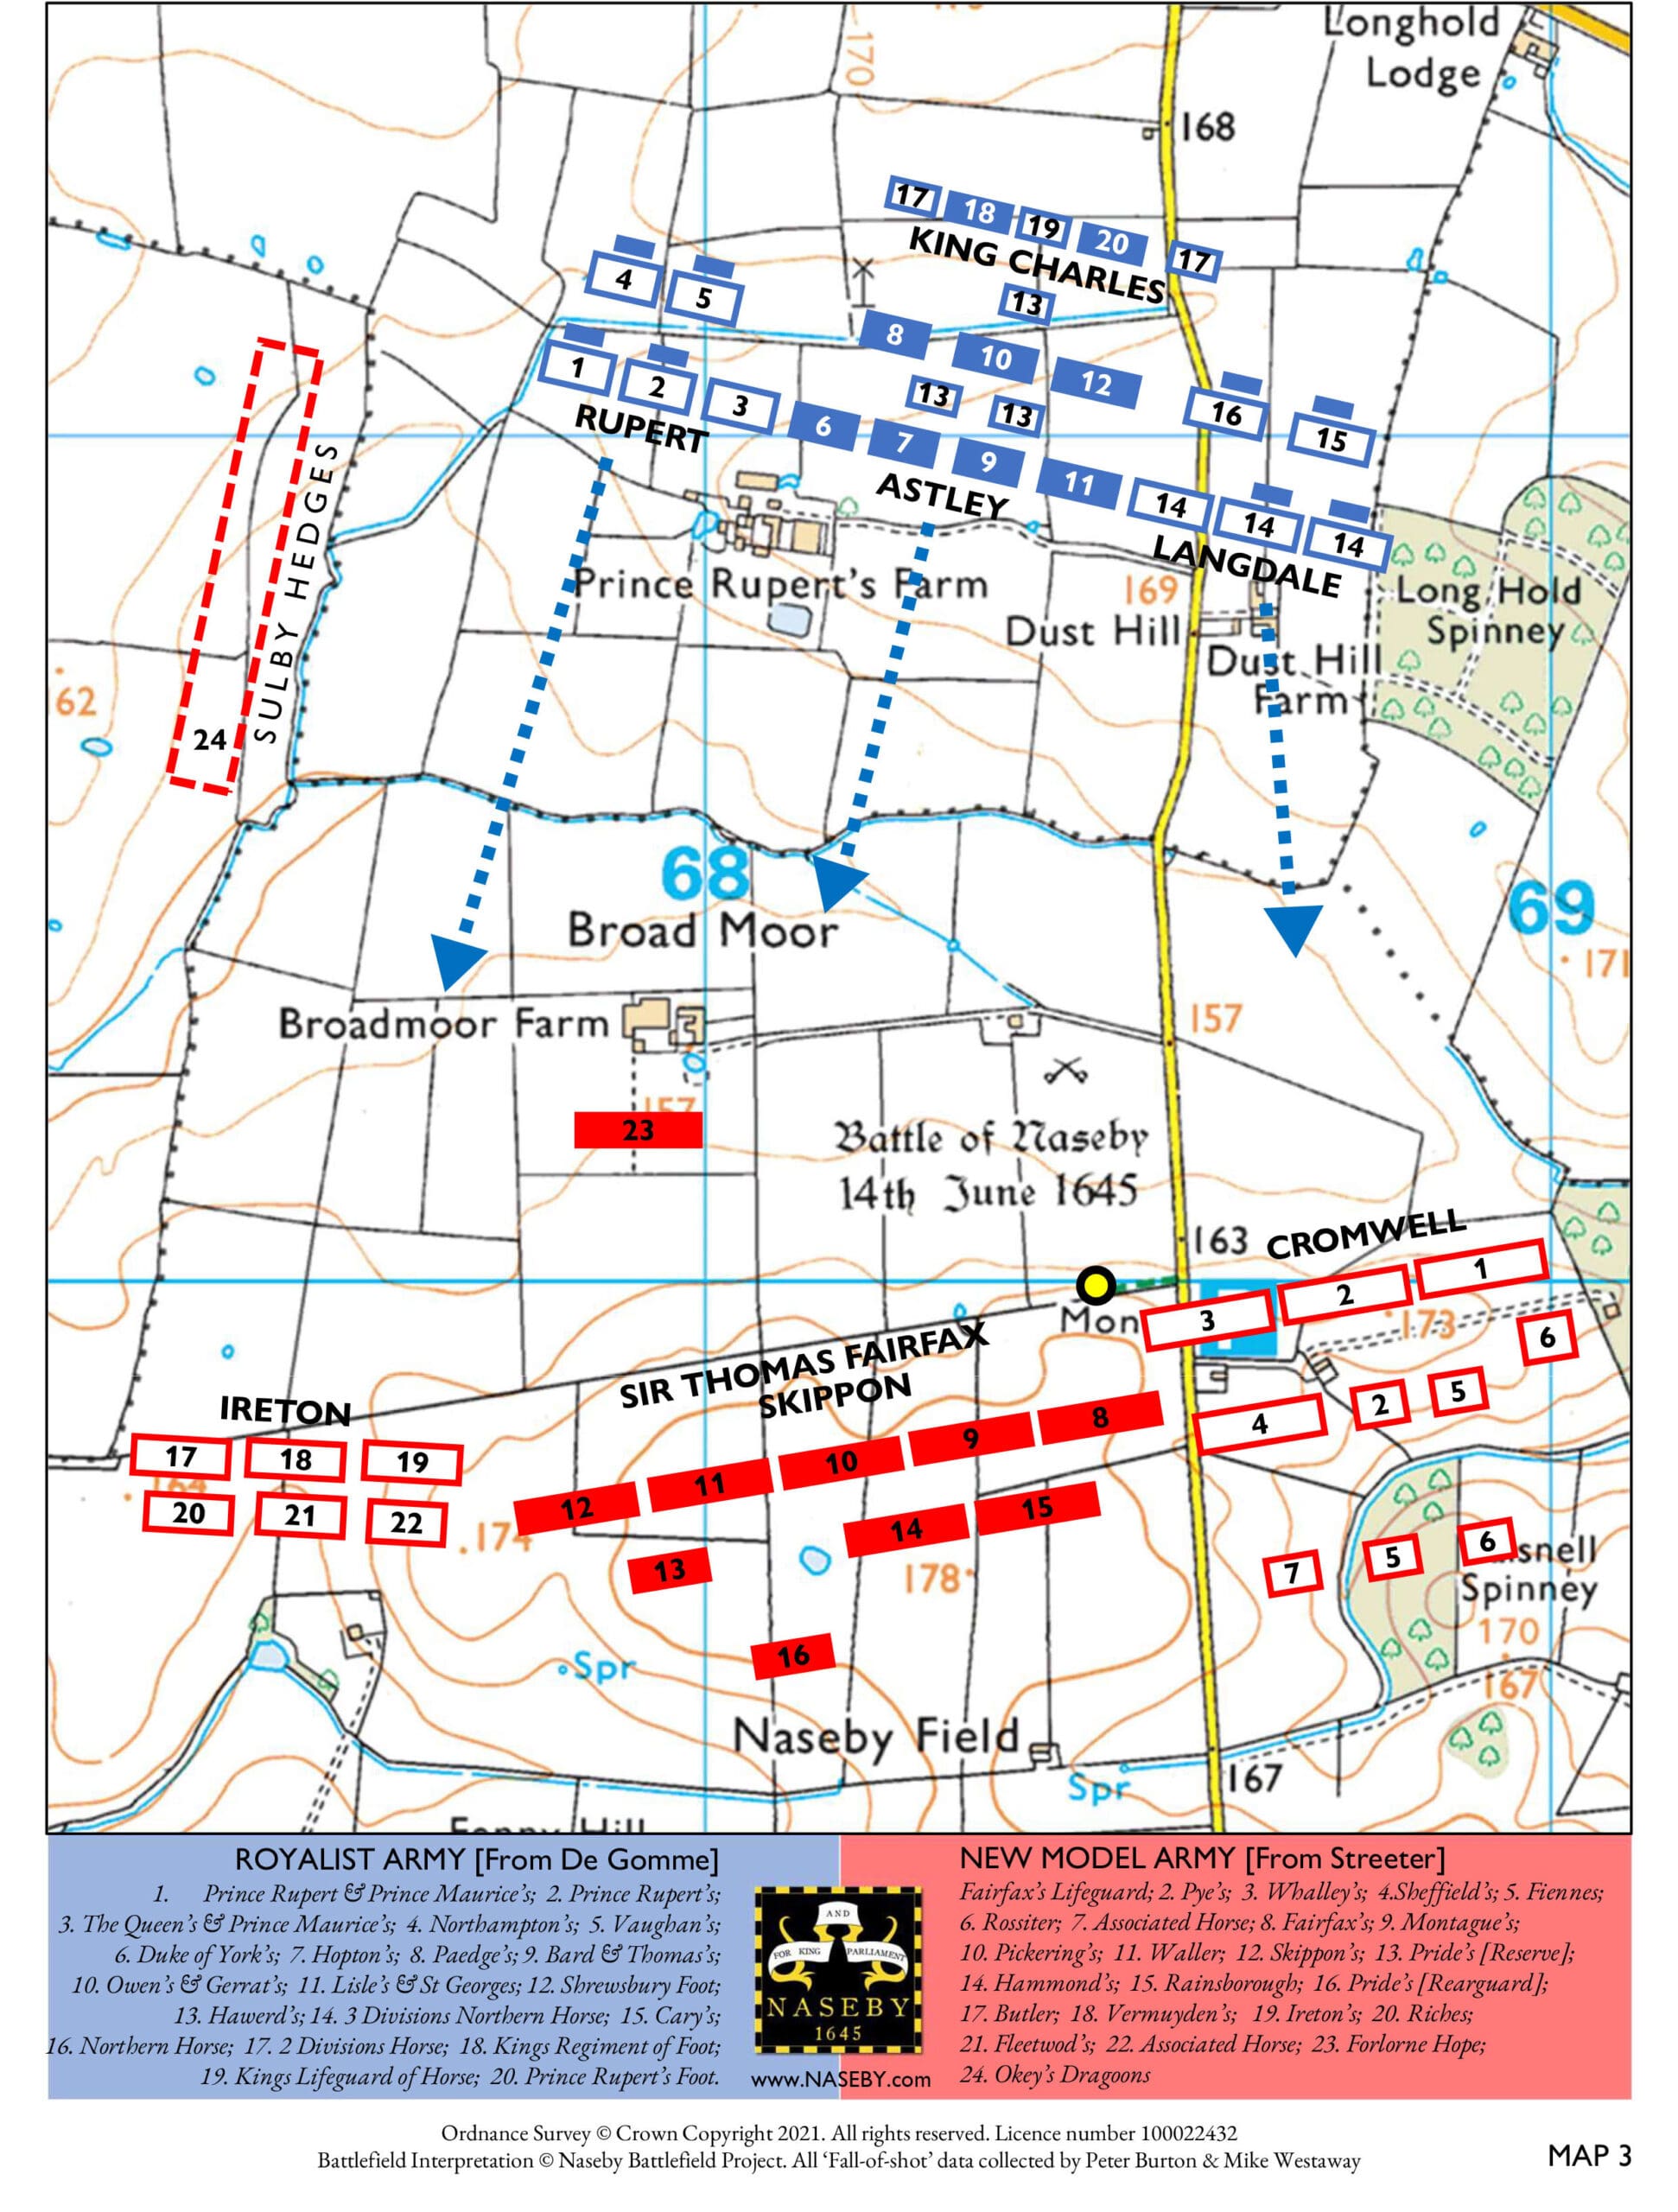
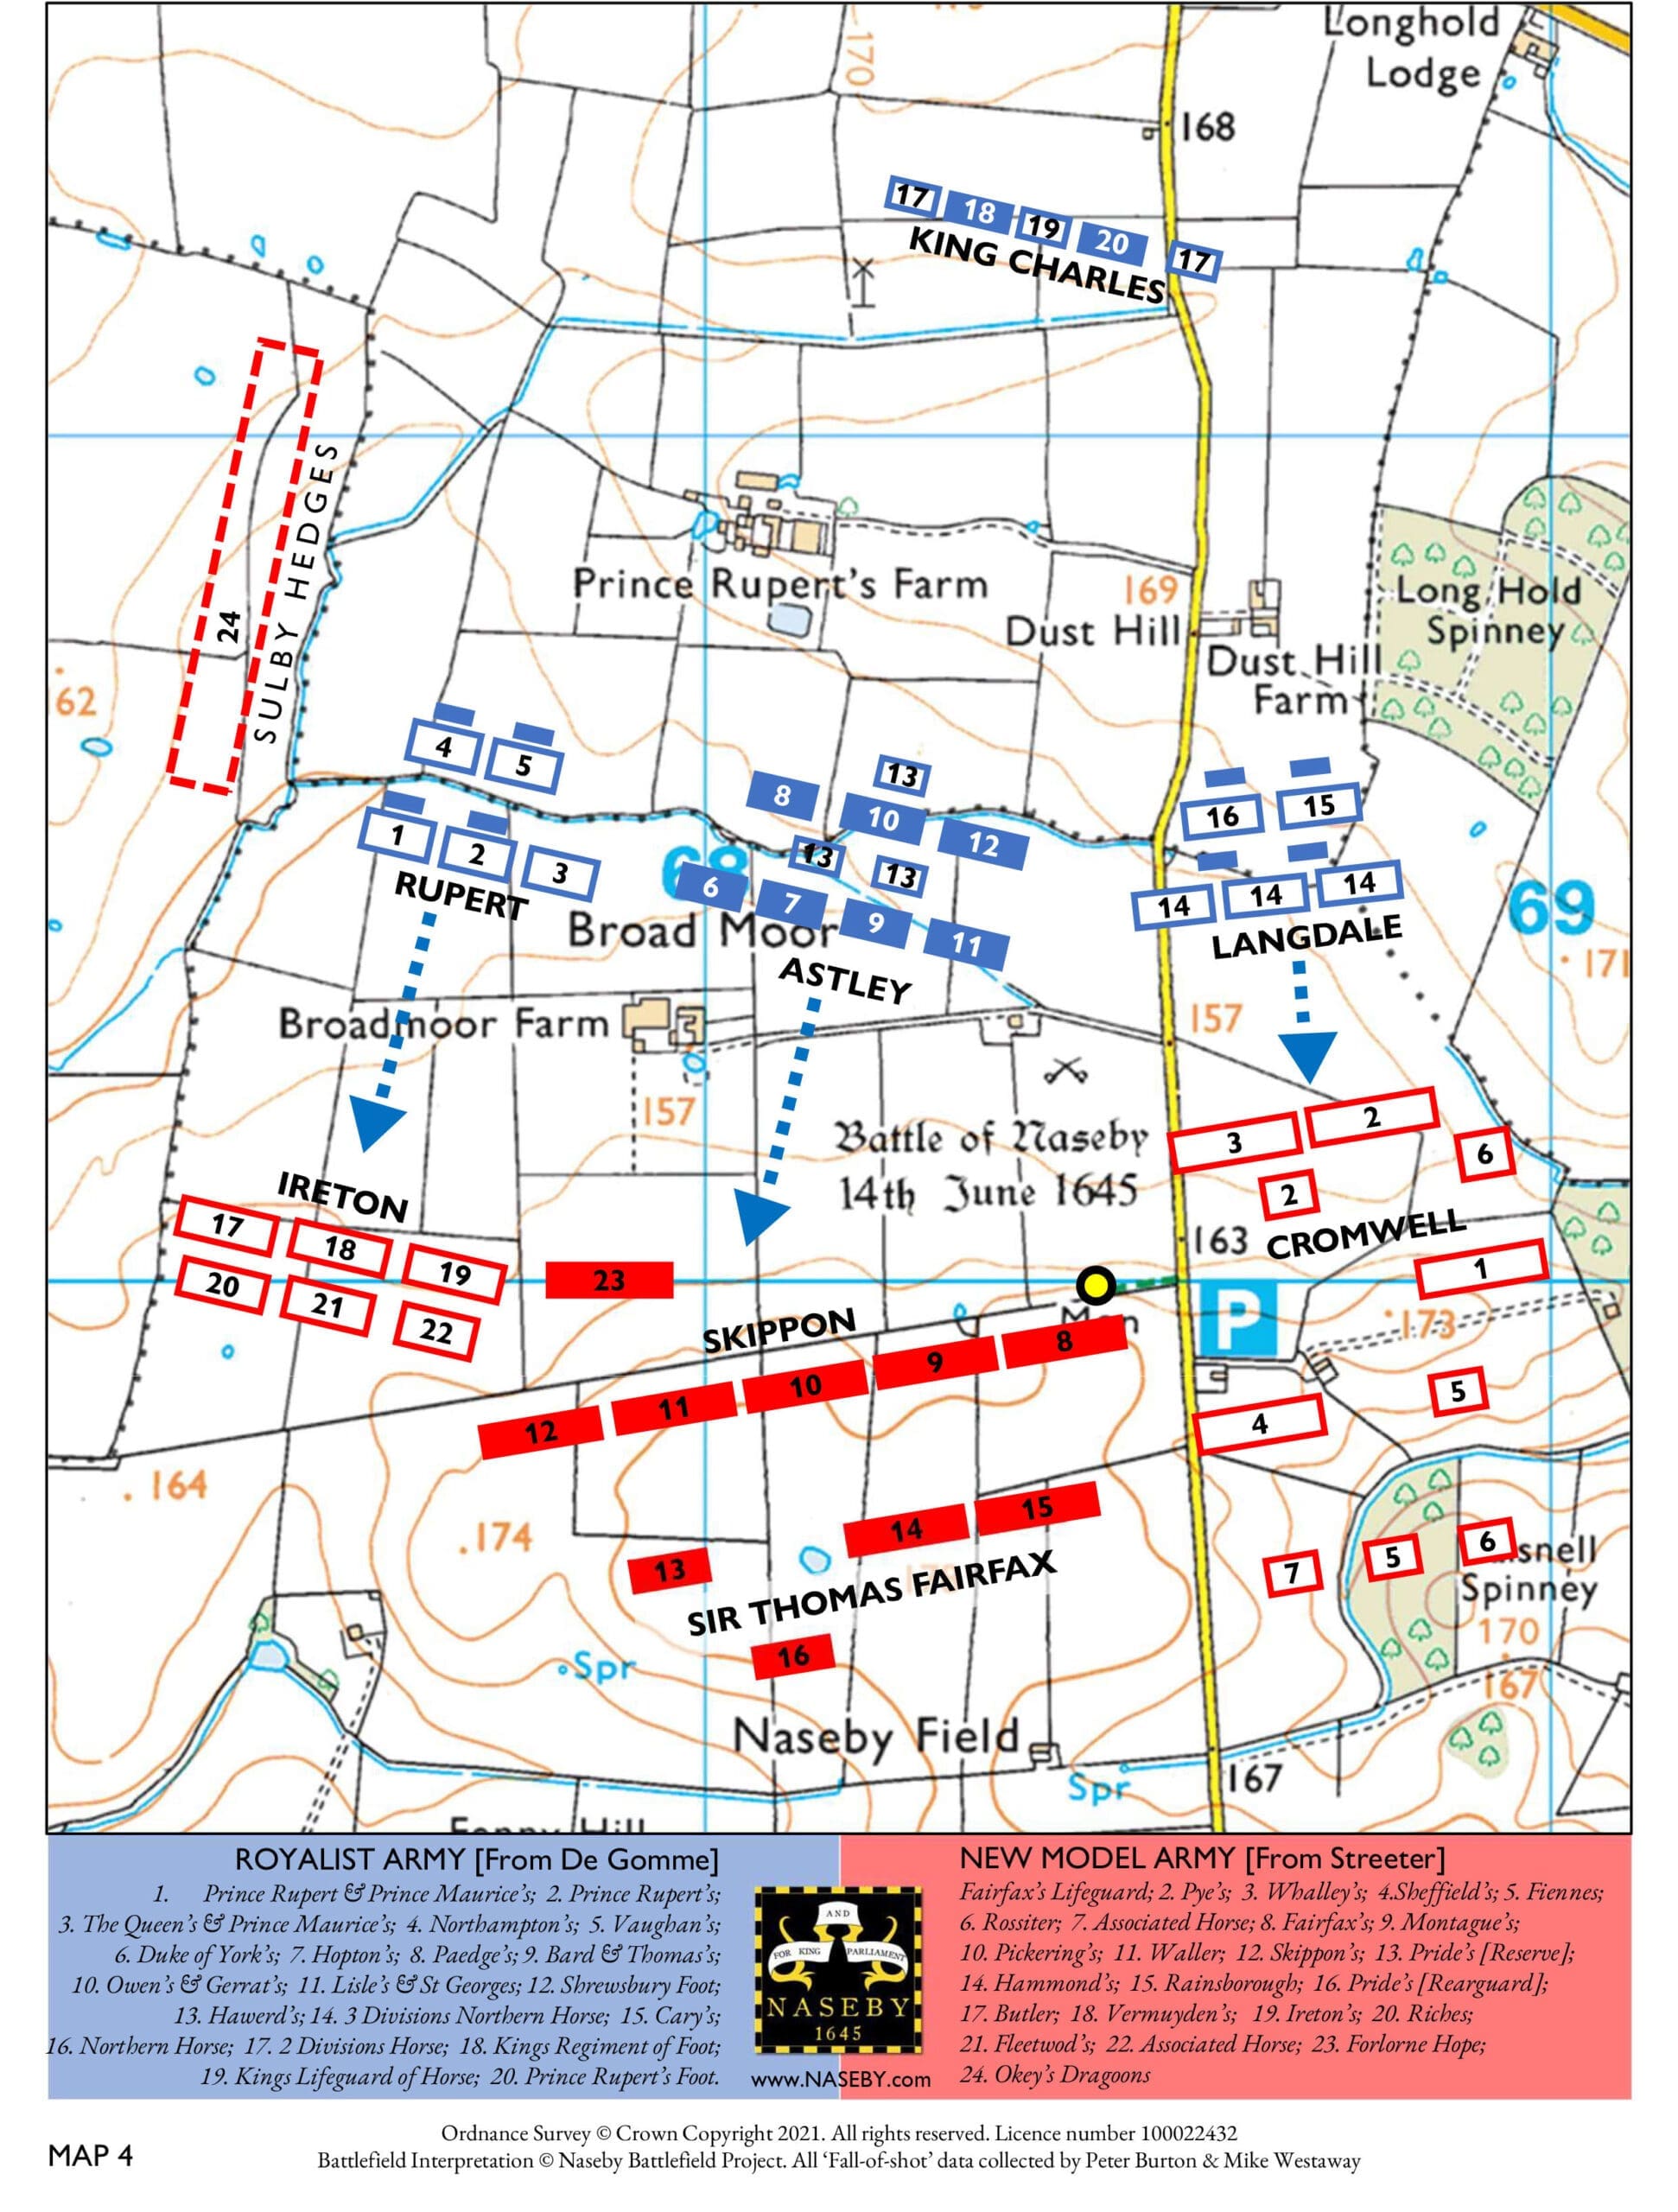
On the maps we have shared you can see the movements of each division throughout the battle. We have evidence to support these movements. Evidence carefully collected by the original founders of The Naseby Battlefield Project maps all the musket shot that have been found on the battlefield.
If you are interested to delve deeper and review these maps, you can either sign up as a Friend or by coming on one of our Bespoke Tours
Early deployment and terrain
During the night the troop of Rupert’s men left in Naseby were killed or captured by Ireton’s patrol. One escaped and alerted Rupert in his quarters in Market Harborough the Kings Head inn. The King who was at the Hall House in Lubenham called a council of war that went on into the night in Market Harborough.
03:00
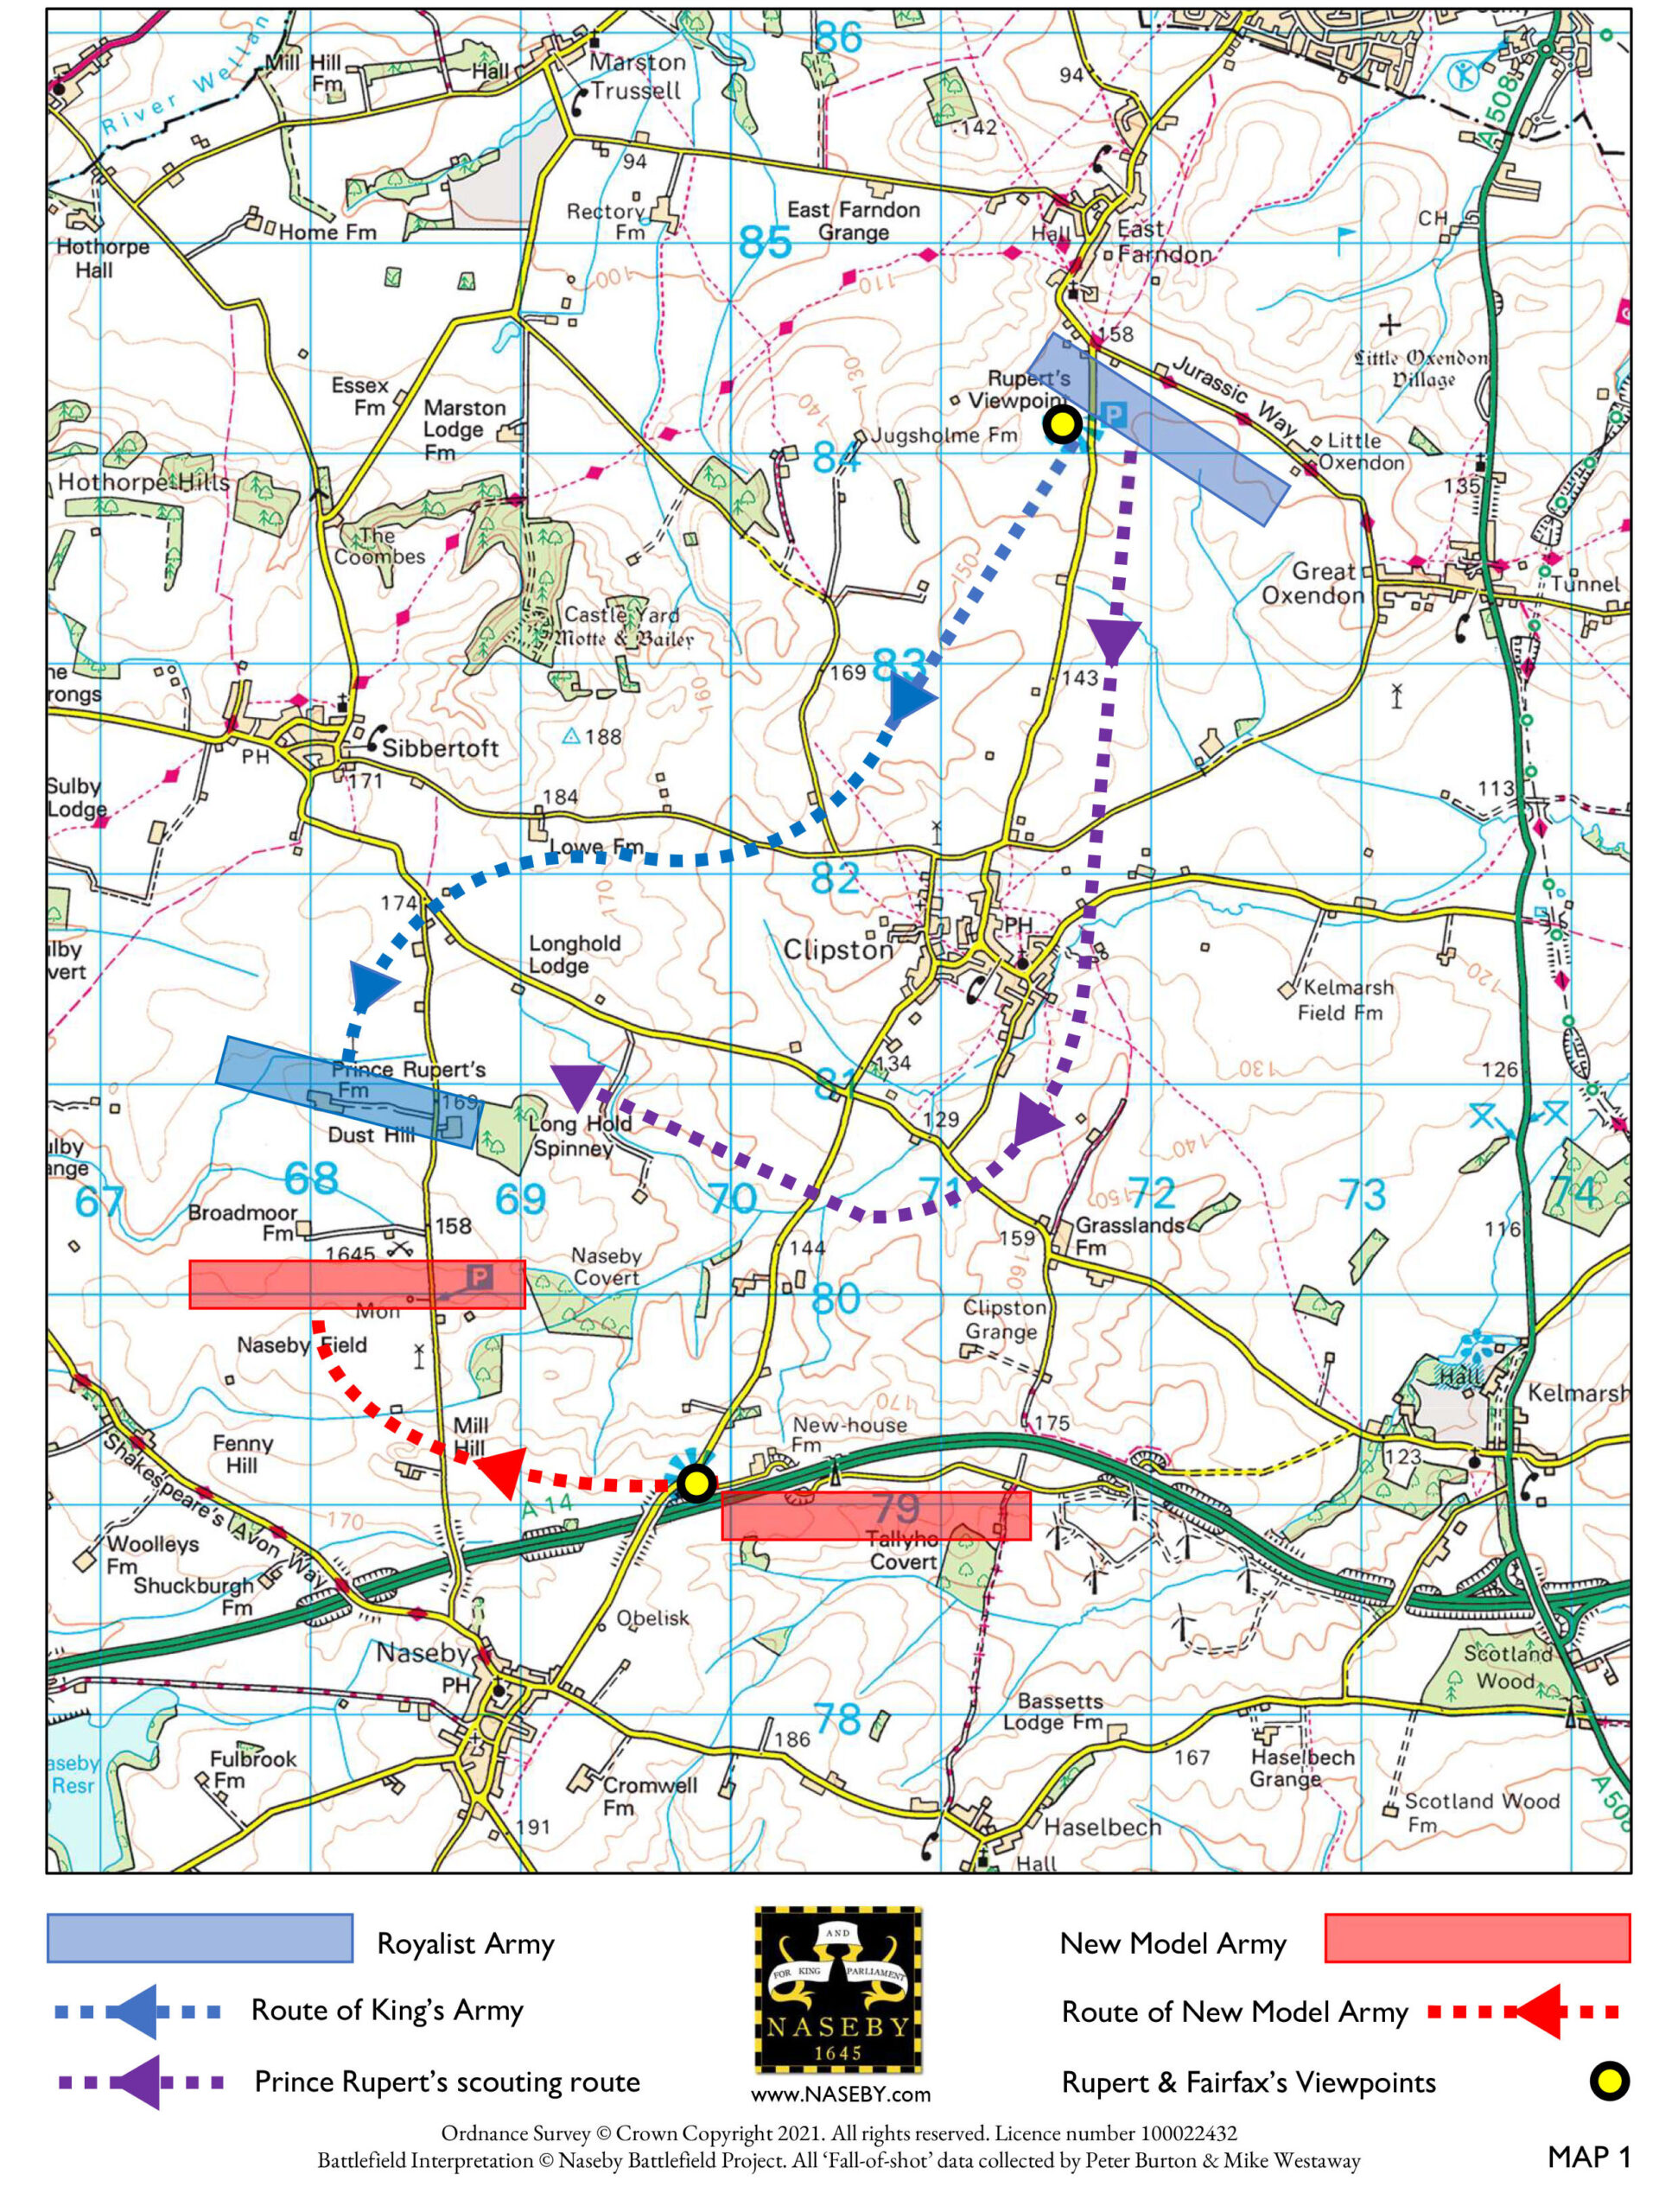
Parliamentarian army roused and begins to move towards Market Harborough – the army is to assemble at the windmill on high ground outside the village of Naseby (Obelisk Viewpoint). The Royalist army begins to assemble four miles away on a ridge south of East Farndon (near Prince Rupert’s Viewpoint). Neither side can see the other.
08:00
Royalists fear their intelligence is wrong and had sent scoutmaster Sir Francis Ruce to discover whereabouts of the New Model Army – he reported to Rupert that he had not “seen or heard the rebels”. Fairfax and Cromwell decide to move from ridge across Mill Hill, to Closter and Sheddon Hills overlooking a flat bottomed valley called Broadmoor. Rupert, decides to look for himself & sees New Model Army moving towards Mill Hill – calls for the king to move Royalist army.
The Royalist army marches south before turning west across Moot Hill, east of Sibbertoft before turning south again and onto a ridge on the other side of Broadmoor called Dust Hill. Their artillery & baggage trains march towards the village of Clipston before turning right along the narrow lane towards Sibbertoft.
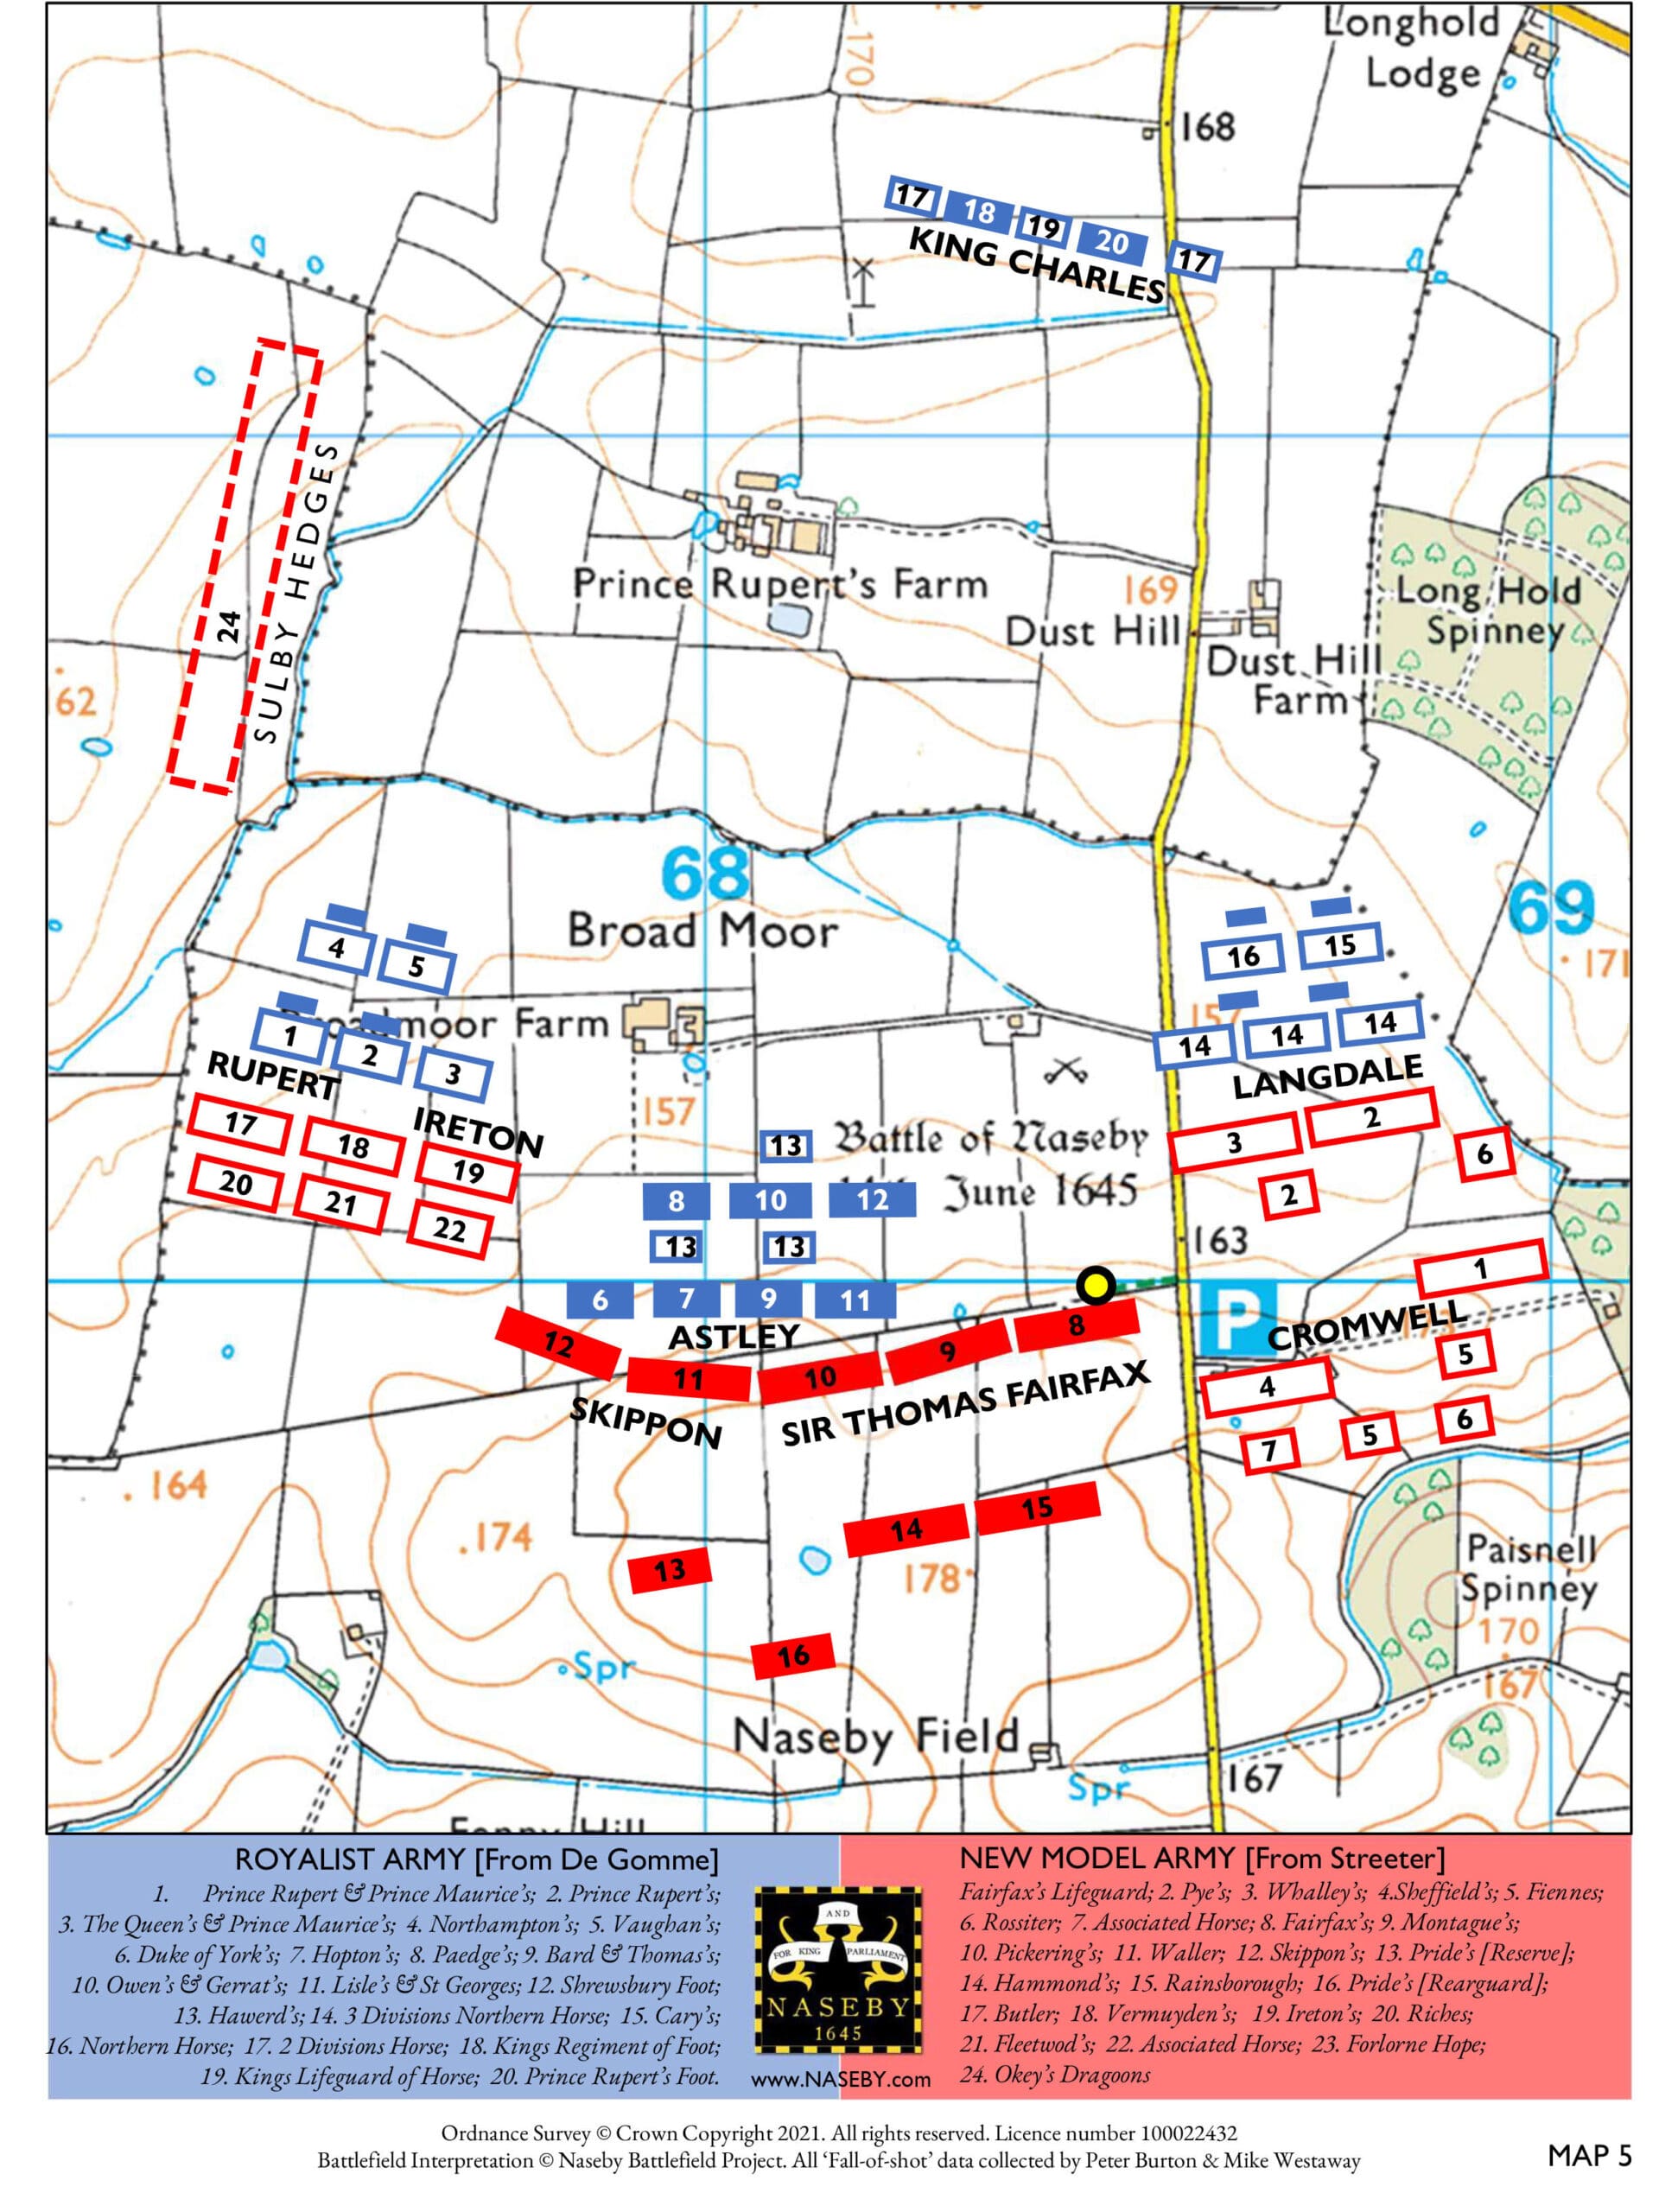
The two sides form up on the ridges on either side of Broadmoor, flanked by Sulby parish boundary hedge to the west, and scrub, furze and bog of the Clipston parish boundary to the east. Both sides placed their infantry in the centre with the horse on each wing.
Battle Array and Initial Movement
09:00
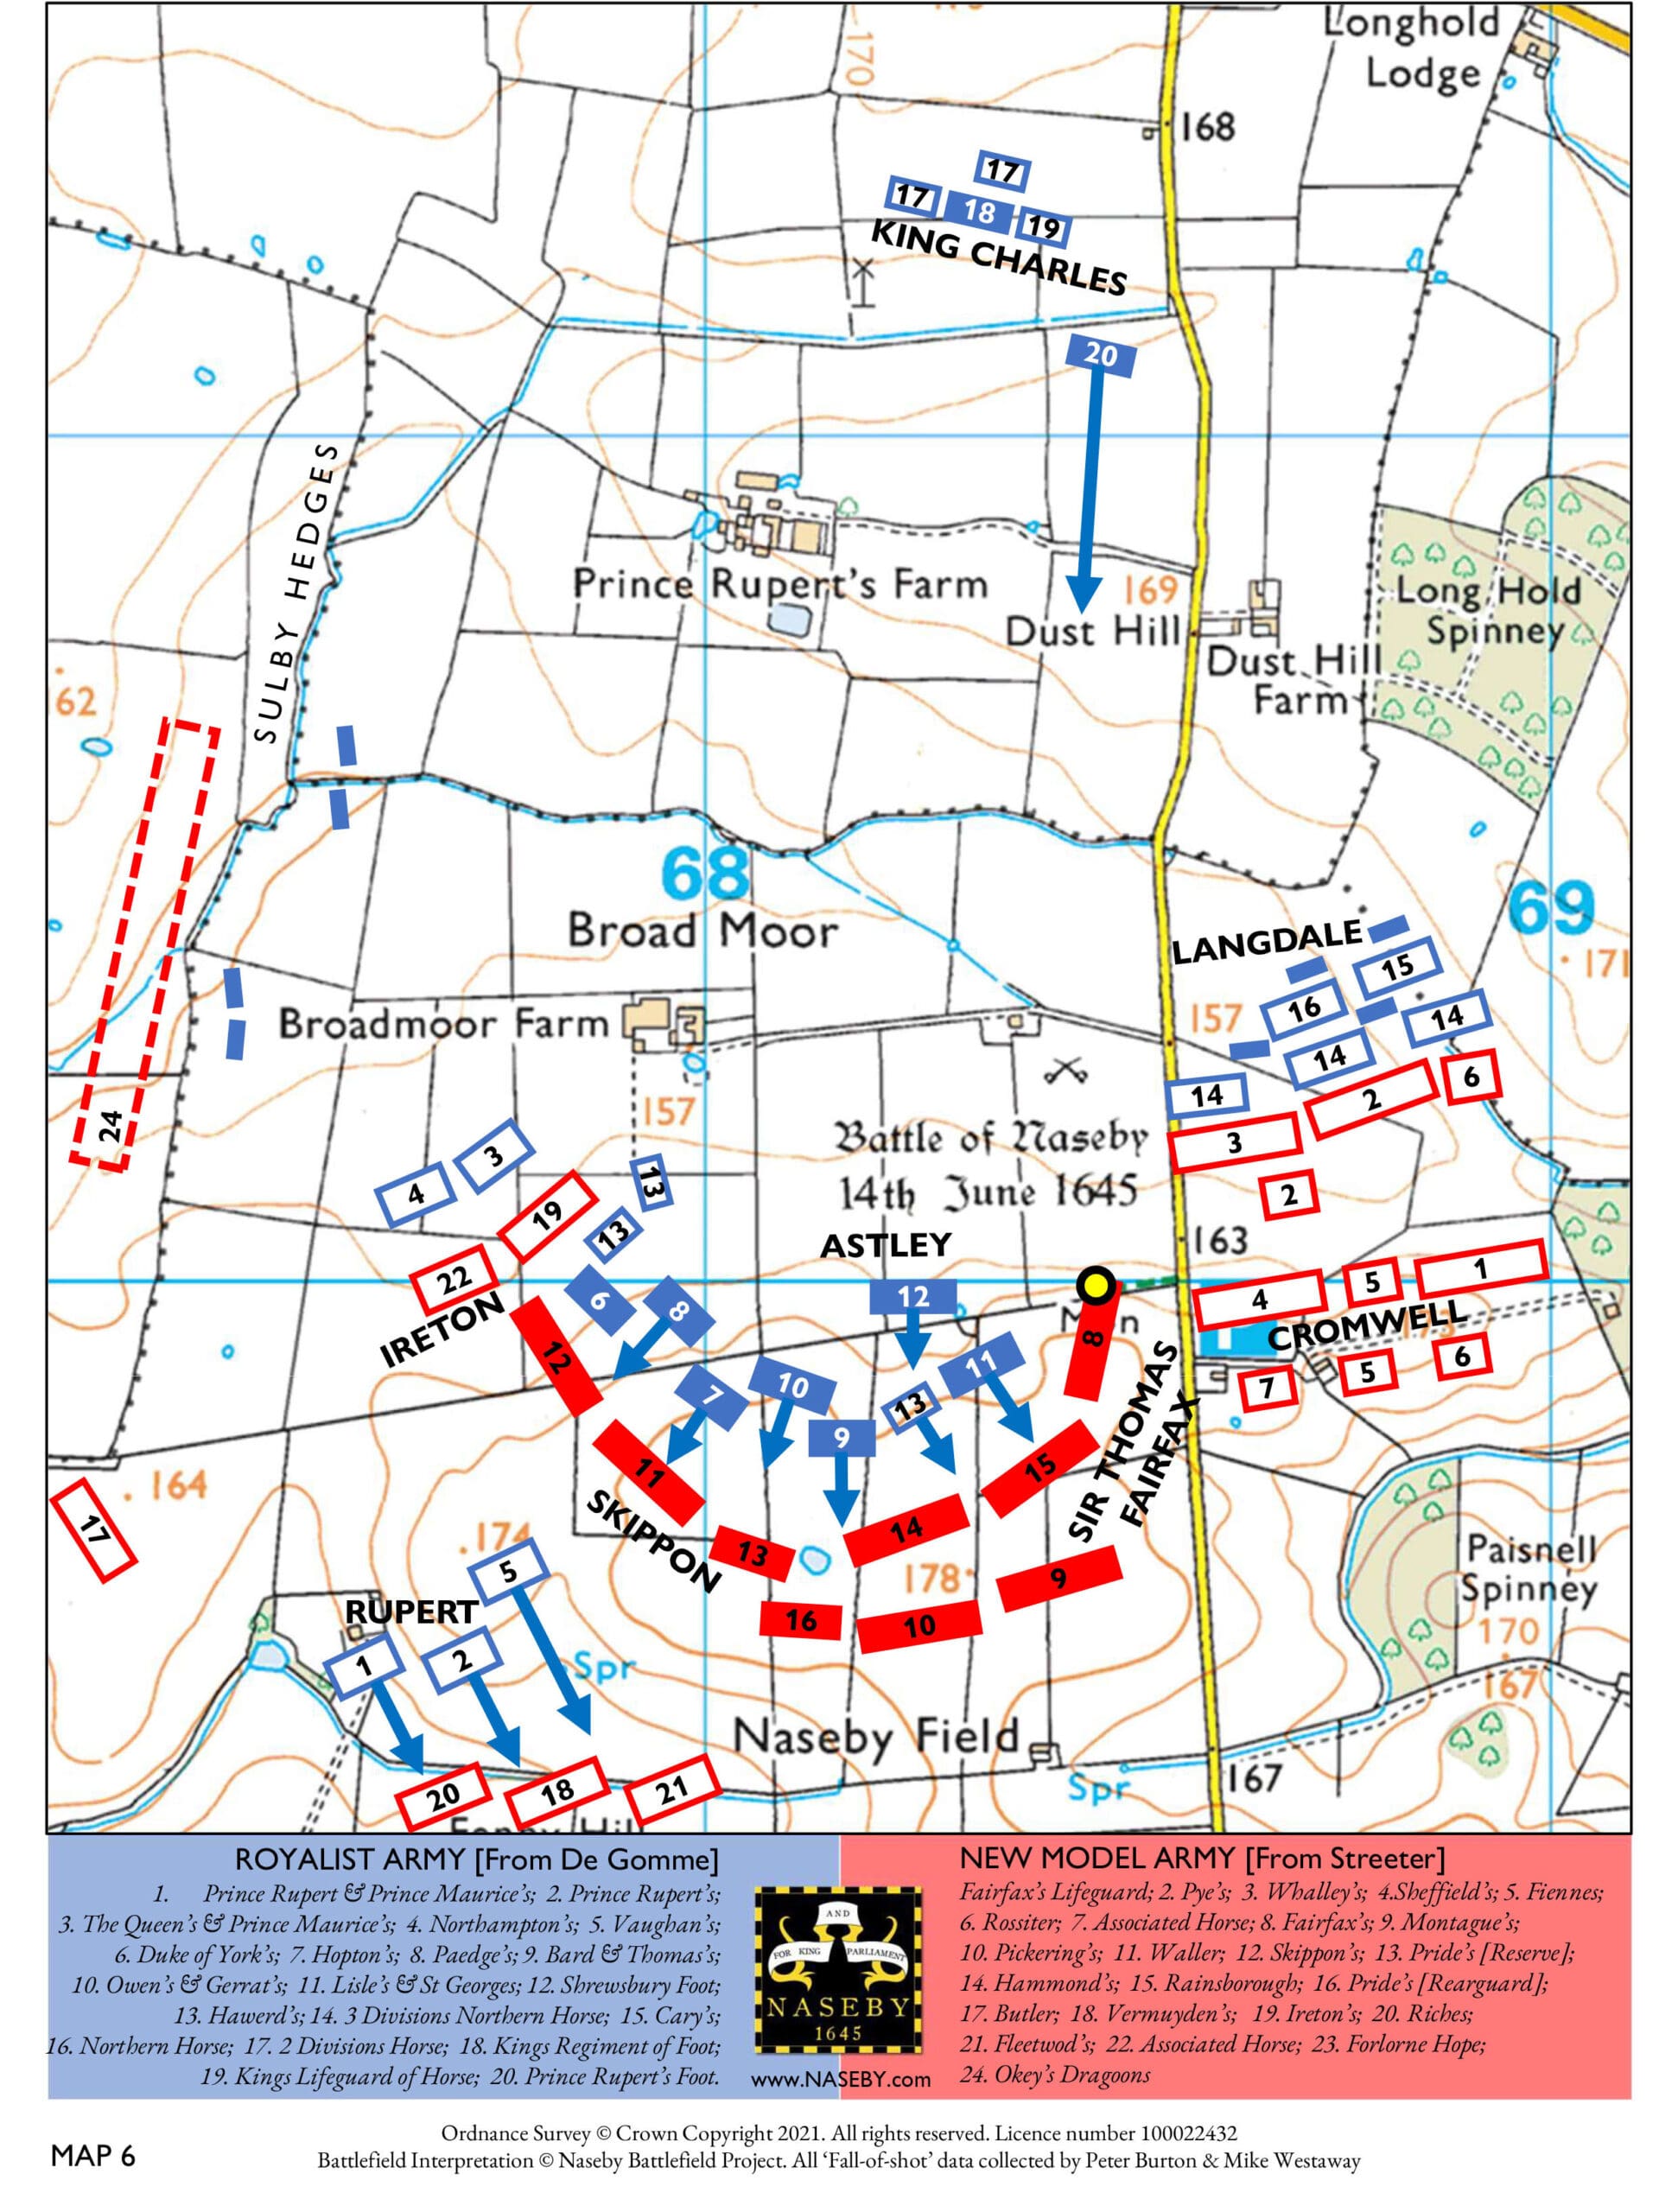
Cromwell sends Colonel John Okey and his dragoons to Sulby Hedge to harass the Royalist right flank. Their fire power may have forced Rupert to advance prematurely. Rupert & Maurice’s horse advance at a slow trot, pausing in the bottom of the valley. Ireton’s cavalry advances to meet them. The two sides meet and engage in fierce hand-to-hand fighting. After the addition of the royalist second line of cavalry, three of Ireton’s regiments break and are put to flight, with Rupert’s men in hot pursuit.
The Battle Begins
The Royalist infantry in the centre advance across the valley floor and up the slope towards the New Model Army, where Fairfax had them formed up, standing just beyond the crest of the ridge. The weight of the Royalist assault falls on the left-hand regiments of the New Model Army, the parliamentarian line is stretched, and two parliamentarian infantry regiments break away from the fight, but they held their discipline to reform in companies behind the reserves.
Royalist Advance and New Model Army Response
10:00
Rupert led the Royalist horse. His tactics were to spearhead the first fierce cavalry advance himself, and to break the opposition with the sheer force of the impact.
Initial Contact across the battlefield
10:05
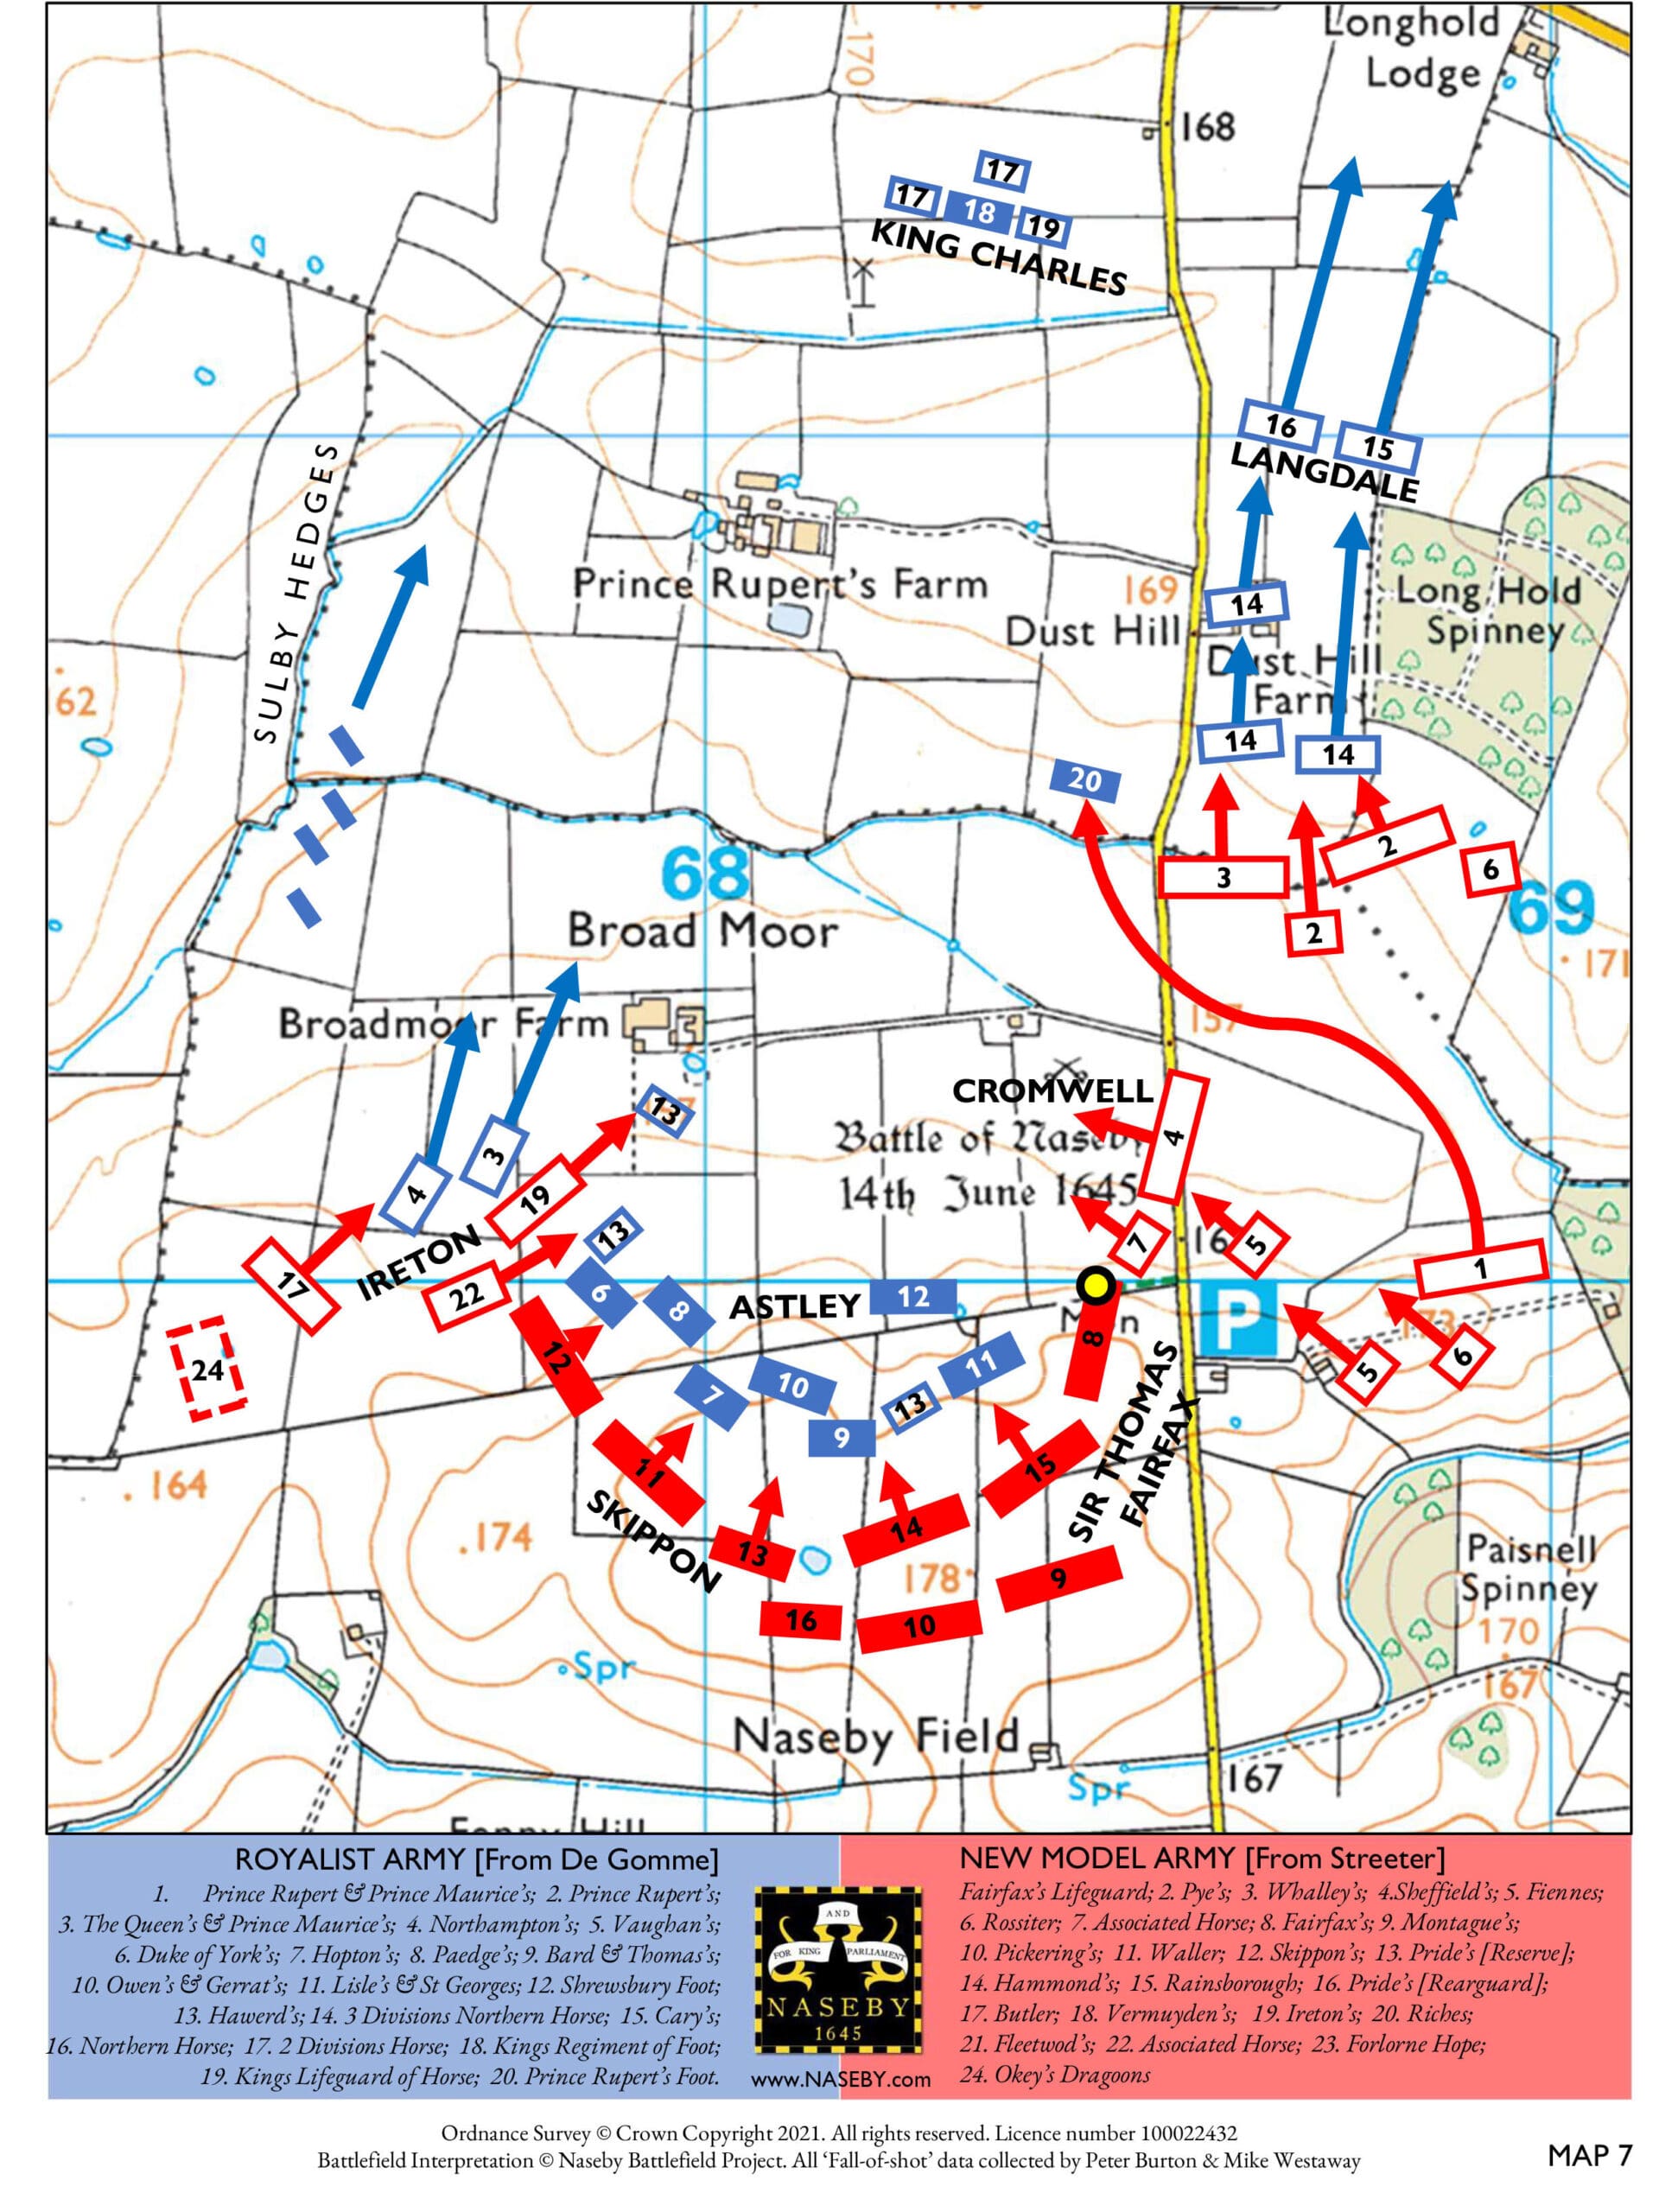
On the eastern flank Sir Marmaduke Langdale’s cavalry, hemmed in between the rabbit warren and furze-covered bog to the east and Fairfax’s infantry to the west, charge uphill but do not break Cromwell’s men, but use their advantageous position and weight of numbers to push them back.
Those of Ireton’s horse who have survived Rupert’s charge attack the Royalist infantry flank. Ireton is wounded in the thigh by a pike and in the face by a halberd and is briefly taken prisoner.
Early Royalist Success
Astley’s men were outnumbered by almost two to one to Skippon’s. Which also meant that he was unable to engage the regiment on Skippon’s right wing – Fairfax’s.
Breaking into the blocks of men or outflanking them was the objective. Astley’s men could only engage with half of the Parliamentarian front line unless he spread them out thinly and used his reserves too. Yet they broke through Skippon’s front line and the Roundhead centre broke in confusion with many men falling in behind the reserves.
Astley’s men captured six pieces of artillery.
Now Astley was dangerously exposed to Fairfax’s regiment who were fresh as they had not been hard pressed to this point in the battle.
Both sides now reinforced their centre.
Fairfax led his reserves forward and the King launched his two reserves regiments.
Lisle’s regiment and Rupert’s Bluecoats, the third line of the reserve, moved up to stop Fairfax’s regiment wheeling around on Lisle’s left flank.
The War hangs in the balance
10:35
For a while, the Royalists seem to be winning, but their success in pushing back the New Model Army in the centre has the effect of the royalist forces being engaged upon three sides. Seeing the need to deploy their reserves, Skippon and Astley both commit second line troops to fill the gaps and strengthen those weakened regiments. Skippon heads back to lead the reserves himself and is accidentally shot through the side by one of his own troops and is down. Knowing the effect on morale, and being the tough commander he was, he refused to leave the field, had his wound dressed and promised ‘I shall not leave this field while one man still stands’. Morale in the parliamentary forces soars. Those that had retreated rally and re-join the battle. Soon the greater parliamentary numbers begin to tell, and the Royalist infantry begins to fall back under withering fire.
On the right flank, having defeated Langdale’s assault, Cromwell commits a third of his forces to see them off the battlefield, and to ensure that the Northern Horse do not rally or re-join the battle. Most of Cromwell’s men remain unengaged, and having dispatched Langdale, he orders his cavalry to wheel left to assault the flank and rear of the Royalist infantry. At around the same time, Okey’s dragoons leave the safety of the hedge, joining Ireton’s rallied regiments and the combined force hits the Royalists in the opposite flank.
. . . an Army completely defeated
12:00
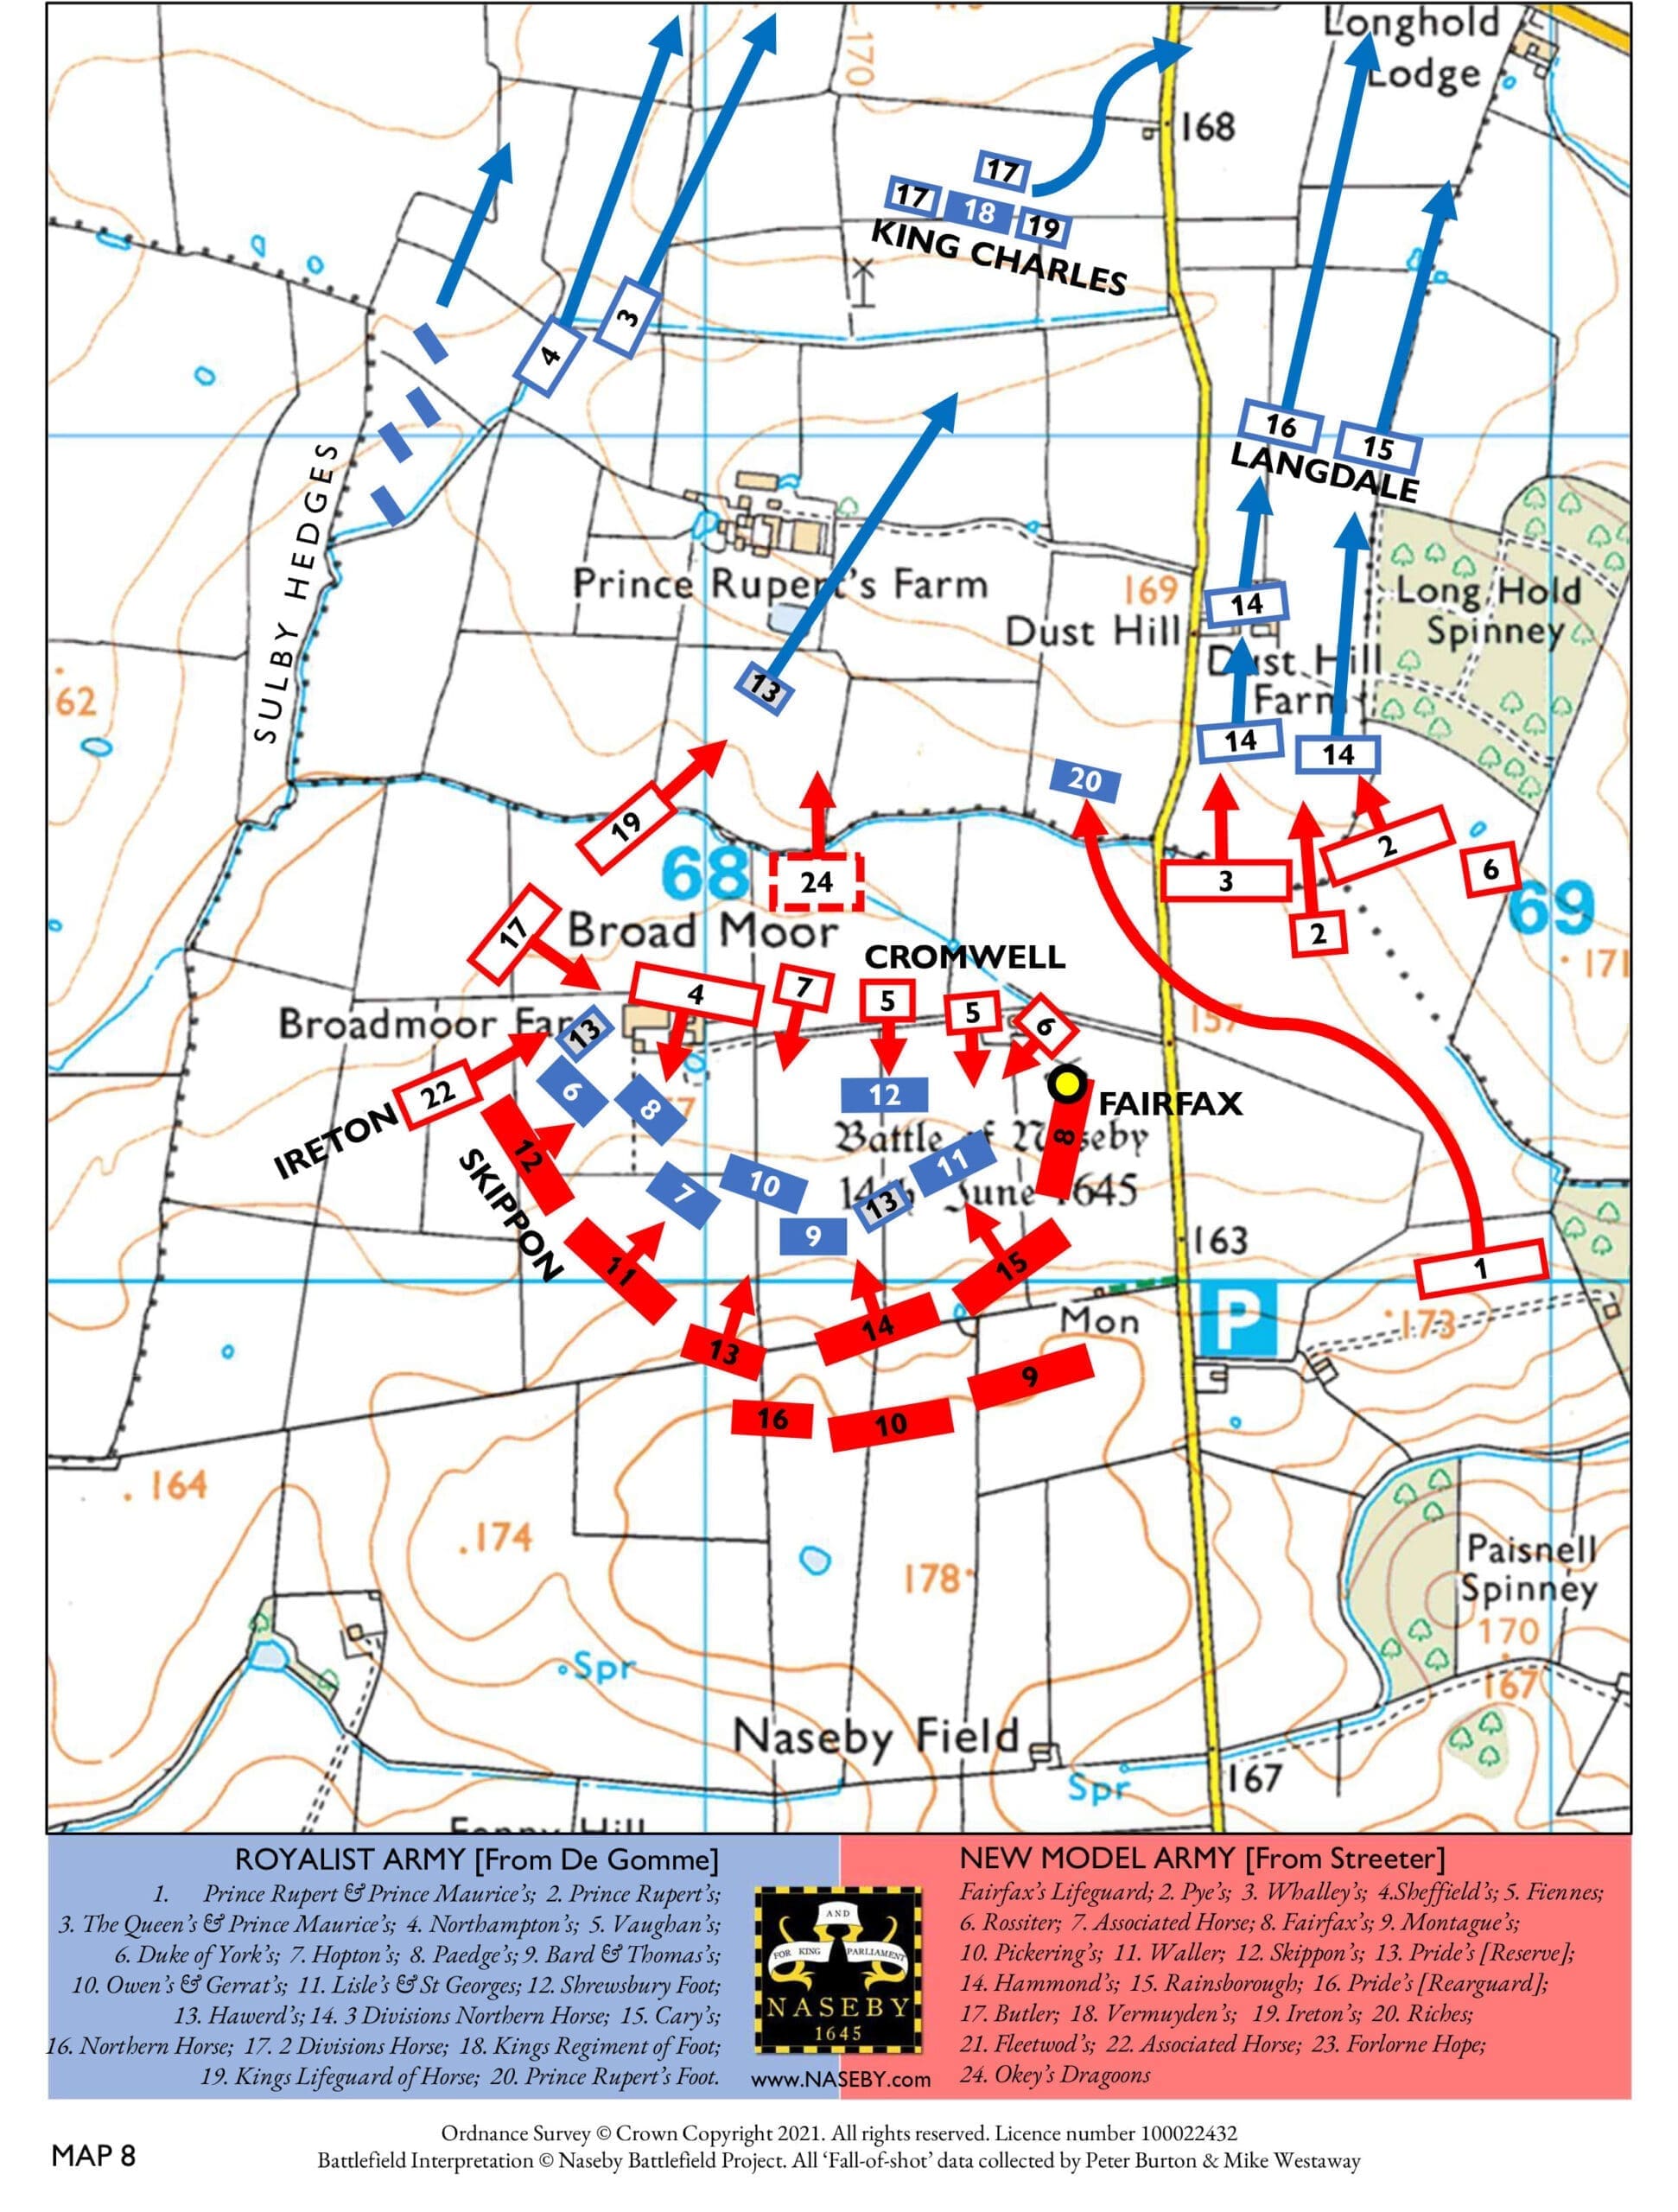
The Royalists being assaulted on all sides soon begin to retreat, with the majority giving up, and they surrender in large numbers. The exception is Prince Rupert’s own infantry regiment, the Bluecoats, stand firm, and they are finally defeated by Fairfax’s own regiment led by his Lifeguard of Horse commander Captain Charles D’Oyley, with the royalist regiment suffering huge losses.
The Royalist army flees through the deserted village of Nobold towards the Sibbertoft to Clipston road. Near Clipston, Rupert’s Welsh camp followers are mistaken for Irish women and a large number of them are massacred, with others being marked by having their faces or noses cut.
Between Moot Hill and Wadborough, the next height to the east, some Royalists make a stand. It is probably here that the King is prevented from launching a counterattack by a Scottish nobleman, the Earl of Carnwath, who seizes his bridle, saying: “Would you go upon your death this instant?” before turning the king’s horse and leading him away.
The flight continues towards East Farndon, Market Harborough and Marston Trussell. In the Royalist camp the victorious Parliamentarians find Charles I’s personal correspondence, showing his plans to seek reinforcements from the Catholic powers on the continent. Parliament publishes the correspondence as ‘The Kings Cabinet Opened’.
15th June
The following day 4,508 were marched south to Northampton and one week later on the 21st June 3,000 prisoners were escorted through London to Westminster and the 55 captured colours and standards carried with the prisoners through the streets.
How you can get involved
There are numerous ways that you can help us continue the valuable work of
educating and inspiring as many as possible about the enduring importance of what happened over 2 hours at Naseby. you can
also continue to expand your understanding of the battle and its ongoing consequences by sharing our latest findings and news.
